Haproxy 安装与配置
2013-04-25 by dongnan
部署
CentOS
环境:
操作系统: CentOS 6.5 amd64
软件版本: haproxy-1.5.2
安装:
yum -y install haproxy
备份配置文件:
cd /etc/haproxy
cp haproxy.cfg haproxy.cfg.bak
编辑配置文件:
vim /etc/haproxy/haproxy.cfg

#添加类似内容

listen admin_stat                   #status
    bind 0.0.0.0:8080               #监听端口
    mode http                       #http的7层模式
    stats refresh 30s               #统计页面自动刷新时间
    stats uri /haproxy_stats_url    #统计页面URL
    stats realm Haproxy\ Statistics #统计页面密码框上提示文本
    stats auth admin:admin          #统计页面用户名和密码设置
    stats hide-version              #隐藏统计页面上HAProxy的版本信息
    stats admin if TRUE             #手工启用/禁用,后端服务器
验证配置文件:
haproxy -f /etc/haproxy/haproxy.cfg -c

Configuration file is valid
启动Haproxy服务:
/etc/init.d/haproxy start
Ubuntu
环境:
操作系统: Ubuntu 12.04.2 LTS
软件版本: HA-Proxy version 1.4.18 2011/09/16
安装:
apt-get install haproxy
备份配置文件:
cp /etc/haproxy/haproxy.cfg /etc/haproxy/haproxy.cfg.bak
编辑配置文件
vim /etc/haproxy/haproxy.cfg
# 参考
测试配置文件:
haproxy -f /etc/haproxy/haproxy.cfg -c

Configuration file is valid
建立chroot目录:
mkdir /usr/share/haproxy
启动haproxy服务:
/etc/init.d/haproxy start
配置文档
#HAProxy 配置文件分为五部分。
#global:
#参数是进程级的,通常和操作系统相关。这些参数一般只设置一次,如果配置无误,就不需要再次配置进行修改

#defaults:
#配置默认参数的,这些参数可以被利用配置到frontend,backend,listen组件

#frontend:
#接收请求的前端虚拟节点,Frontend可以根据规则直接指定具体使用后端的backend(可动态选择)。

#backend:
#后端服务集群的配置,是真实的服务器,一个Backend对应一个或者多个实体服务器。

#listen:
#Frontend和Backend的组合体。

global
    log 127.0.0.1 local1
    maxconn 65000             #最大连接数
    chroot /usr/local/haproxy #安装目录
    uid 99                    #用户haproxy
    gid 99                    #组haproxy
    daemon                    #守护进程运行
    nbproc 2                  #进程数量
    pidfile /usr/local/haproxy/logs/haproxy.pid #haproxy pid

defaults
   log     global
   mode    http               #7层#默认的模式mode {tcp|http|health},tcp是4层,http是7层,health只会返回OK
   option  httplog            #http 日志格式
   option  httpclose          #主动关闭http通道,HA-Proxy不支持keep-alive模式
   option  redispatch         #serverId对应的服务器挂掉后,强制定向到其他健康的服务器
   option  forwardfor         #后端服务器需要获得客户端的真实IP,将从Http Header中获得客户端IP
   option  dontlognull        #来防止记录 Alteo(4层负载均衡)发出的健康检测,如果一个 session 交互没有数据,这个 session就不会被记录
   maxconn 50000              #最大连接数
   contimeout      5000       #连接超时(毫秒)
   clitimeout      50000      #客户端超时(毫秒)
   srvtimeout      50000      #服务器超时(毫秒)

   #errorfile 502 /usr/local/haproxy/html/maintain.html
   #errorfile 503 /usr/local/haproxy/html/maintain.html
   #errorfile 504 /usr/local/haproxy/html/maintain.html


frontend test.com             #定义前端服务器(haproxy)
        bind *:80             #监听地址
        #
        acl static path_end -i .jpg .png .bmg .gif .css .js
        #acl web-client path_beg -i /vsphere-client
        acl bbs hdr_reg(host) -i ^(bbs.test.com|shequ.test.com|forum|phpwind|home)
        acl blog hdr_reg(host) -i ^(blog.test.com|t)
        #acl jsp path_end -i .jsp .do
        acl monitor hdr_beg(host) -i monitor.test.com    #定义ACL名称,对应的请求的主机头是monitor.test.com
        acl www hdr_beg(host) -i www.test.com
        acl jsp hdr_reg(host) -i ^(center.test.com|java|jsp)
        #
        use_backend  tomcat.test.com if jsp
        use_backend  cache.test.com if static
        use_backend  monitor.test.com if monitor
        use_backend  bbs.test.com if bbs
        use_backend  blog.test.com if blog
        use_backend  www.test.com if www
        #use_backend  vsphere-client if web-client
        #
        default_backend www.test.com  #指定默认的后端服务器

backend monitor.test.com      #定义后端服务器群(web server/apache/nginx/iis..)
        mode http
        option  forwardfor    #后端服务器(apache/nginx/iis/*),从Http Header中获得客户端IP
        balance leastconn     #负载均衡的方式,最小连接
        cookie  SERVERID      #插入serverid到cookie中,serverid后面可以定义
        option  httpchk HEAD /check.html #用来做健康检查html文档
        #option httpchk HEAD /index.php HTTP/1.1\r\nHost:monitor.test.com #HTTP && Host
        server  monitor 10.0.100.70:80 cookie monitor check inter 2000 rise 3 fall 3 weight 3
        #服务器定义:
        #cookie server1表示serverid为server1;
        #check inter 2000 是检测心跳频率(check 默认 );
        #rise 3 表示 3次正确认为服务器可用;
        #fall 3 表示 3次失败认为服务器不可用;
        #weight 表示权重。

backend bbs.test.com
        mode http
        option  forwardfor
        balance roundrobin    #负载均衡的方式,轮询方式
        cookie  SERVERID insert indirect      #插入serverid到cookie中,serverid后面可以定义
        option  httpchk HEAD /check.html
        #option httpchk HEAD /index.php HTTP/1.1\r\nHost:monitor.test.com #HTTP && Host
        server  bbs01 10.0.100.75:80 cookie bbs01 check inter 2000 rise 3 fall 3 weight 3

backend blog.test.com
        mode http
        option  forwardfor
        balance roundrobin
        cookie  SERVERID
        option  httpchk HEAD /check.html
        server  blog01 10.0.100.76:80 cookie blog01 check inter 2000 rise 3 fall 3 weight 3

backend www.test.com
        mode http
        option  forwardfor
        balance roundrobin    #负载均衡的方式,轮询方式
        cookie  SERVERID
        option  httpchk HEAD /check.html
        server  www01 10.0.100.71:80 cookie www01 check inter 2000 rise 3 fall 3 weight 3

backend cache.test.com
        mode http
        option  forwardfor
        #balance uri len 15 #url hash
        balance roundrobin
        cookie SERVERID
        server squid01 10.0.100.72:80 cookie squid01 check inter 2000 rise 3 fall 3 weight 3
        server squid02 10.0.100.73:80 cookie squid02 check inter 2000 rise 3 fall 3 weight 3

backend tomcat.test.com
        mode http
        option  forwardfor
        balance roundrobin
        cookie  SERVERID
        option  httpchk HEAD /index.html
        server  tomcat01 10.0.100.77:8080 cookie tomcat01 check inter 2000 rise 3 fall 3 weight 3
        server  tomcat02 10.0.100.78:8080 cookie tomcat02 check inter 2000 rise 3 fall 3 weight 3

#backend vsphere-client
#        mode http
#        option  forwardfor header ORIG_CLIENT_IP
#        balance roundrobin
#        server server1 10.0.100.81:80 redir https://192.168.57.81:443 check inter 2000 rise 3 fall 3 weight 3


listen admin_stat                   #status
    bind 0.0.0.0:8080               #监听端口
    mode http                       #http的7层模式
    stats refresh 30s               #统计页面自动刷新时间
    stats uri /haproxy_stats_url    #统计页面URL
    stats realm Haproxy\ Statistics #统计页面密码框上提示文本
    stats auth admin:admin          #统计页面用户名和密码设置
    stats hide-version              #隐藏统计页面上HAProxy的版本信息
    stats admin if TRUE             #手工启用/禁用,后端服务器
验证
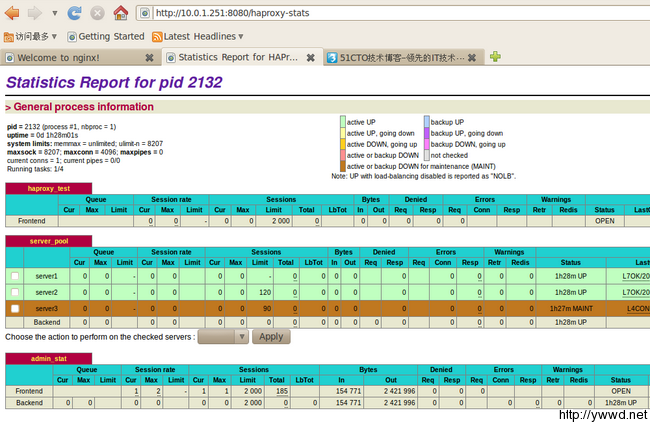
Haproxy 统计控制台:
